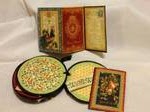
I am back with another design team project for Lone Wolf Designs, LLC. Most of the items used in this project can be found in her on line shop. Head over to You Tube for the video, but here are some pics of the pages. This was made to fit INSIDE!!!! the TH clock I showed a week or so ago.
Here is the front cover
The insert that fits under the band I made with a sticker from the collection. The front cover is a piece from the cardboard sheet I used the largest scalloped Nestie circle to layer the pages.
A few other pages:
You can purchase the Tim Holtz Ideology Clock, Graphic 45 French Country collection, and hundreds
of other craft supplies at 25% off of MSRP at Lone Wolf Designs, LLC!
Check it out at www.lonewolfdesignsllc.com. If you're buying your craft
supplies anywhere else, you're paying too much!
Cards created this year to send to our Nation's Heros....24
Showing posts with label lone wolf designs. Show all posts
Thursday, May 9, 2013
Friday, May 3, 2013
Altered Tim Holtz Ideology Assemblage Clock with Graphic 45 French Country
I was so excited to FINALLY get my hands on this clock. From the very beginning I knew I wanted to alter it with this great G45 line and stuff it with a super fun mini (coming in a few weeks)
And it was even more fun than I thought it would be!! I put a coat of paint on to shab it up a bit, and then just layered on flowers some spell binders cut to frame the 'face' and pieces from the paper collection. This was such fun!! To get a better link and a bit more dialog about what I did the link to the youtube video = click here
You can purchase the Tim Holtz Ideology Clock, Graphic 45 French Country collection, and hundreds of other craft supplies at 25% off of MSRP at Lone Wolf Designs, LLC! Check it out at www.lonewolfdesignsllc.com. If you're buying your craft supplies anywhere else, you're paying too much!
Labels:
altered clock,
crafty khandy,
craftykhandy,
french country garden,
graphic 45,
lone wolf designs,
Tim Holtz
Friday, April 5, 2013
Distressing Techniques
Life is distressing enough… adding a distressed detail to your paper crafting shouldn’t be!! For this month’s design team project for Lone Wolf Designs I am going to walk you through a few of the techniques I use. I have no doubt there are a lot – A LOT more out there. But these are my go to.
1) Direct to paper. Just like it sounds I rub the ink pad right on top of the paper. I tend to stick to the edges, but sometimes ink it all up. This one is MESSY!
I use this to create a tree trunk look, over crumpled paper it really adds that ‘old’ feel. And it is quick – but that is almost never my goal ;)
This photo has Stampin Up’s Very Vanilla crumpled – on the right it has Walnut stain and the left Tea Dye This is a look at the all over technique – Walnut Stain on the right and Tea Dye on the left again
2) Just softening the edges. I use a lot of matting in my paper projects. I think it makes things look more finished. A soft line on the edge is a way to add another layer and blend your top sheet into the bottom.
On the right I used the ink pad and just lightly stroked it down the very edge of the paper. On the left I used a sponge dauber to just gently pull the onto the paper.
I used whisper white and Tumbled Glass here on the right and Black Soot on the left
3) Dual Inking. For a really aged distressed look I have two favorites and I use the walnut stain and vintage photos for bothsides. I used the sponge dauber like above but pulled it in a bit farther. This is the lighter color so I used Vintage Photo.
Then I went over it again with Walnut Stain, only I just covered about half the space from before. Darker to the outside edge of course.
4) Now we are going to get fancy… First… On the right (above) I used an old (older the better) nail file and roughed it up. Sometimes I will add back in a bit of ink if I take off too much. For the left… I get it wet! Tiniest amount of clear water on a flat skinny brush and just barely touch the edge and drag it in a bit. This helps the two inks to mix up and really look like time has been ticking away on the edges.
I give these looks a bit of ink in the focal area as well. Can’t be all crisp and pretty inside with this ragged edges!!
Here is a card I made with the last technique(s) For my mom's birthday:
You can purchase the Distress Inks, ink applicator tools, and hundreds of other craft supplies at 25% off of MSRP at Lone Wolf Designs, LLC! Check it out at www.lonewolfdesignsllc.com. If you're buying your craft supplies anywhere else, you're paying too much!
1) Direct to paper. Just like it sounds I rub the ink pad right on top of the paper. I tend to stick to the edges, but sometimes ink it all up. This one is MESSY!
I use this to create a tree trunk look, over crumpled paper it really adds that ‘old’ feel. And it is quick – but that is almost never my goal ;)
This photo has Stampin Up’s Very Vanilla crumpled – on the right it has Walnut stain and the left Tea Dye This is a look at the all over technique – Walnut Stain on the right and Tea Dye on the left again
2) Just softening the edges. I use a lot of matting in my paper projects. I think it makes things look more finished. A soft line on the edge is a way to add another layer and blend your top sheet into the bottom.
On the right I used the ink pad and just lightly stroked it down the very edge of the paper. On the left I used a sponge dauber to just gently pull the onto the paper.
I used whisper white and Tumbled Glass here on the right and Black Soot on the left
3) Dual Inking. For a really aged distressed look I have two favorites and I use the walnut stain and vintage photos for bothsides. I used the sponge dauber like above but pulled it in a bit farther. This is the lighter color so I used Vintage Photo.
Then I went over it again with Walnut Stain, only I just covered about half the space from before. Darker to the outside edge of course.
4) Now we are going to get fancy… First… On the right (above) I used an old (older the better) nail file and roughed it up. Sometimes I will add back in a bit of ink if I take off too much. For the left… I get it wet! Tiniest amount of clear water on a flat skinny brush and just barely touch the edge and drag it in a bit. This helps the two inks to mix up and really look like time has been ticking away on the edges.
I give these looks a bit of ink in the focal area as well. Can’t be all crisp and pretty inside with this ragged edges!!
Here is a card I made with the last technique(s) For my mom's birthday:
You can purchase the Distress Inks, ink applicator tools, and hundreds of other craft supplies at 25% off of MSRP at Lone Wolf Designs, LLC! Check it out at www.lonewolfdesignsllc.com. If you're buying your craft supplies anywhere else, you're paying too much!
Labels:
crafty khandy,
design team,
distress ink,
distressing techniques,
distressing tutorials,
lone wolf designs
Saturday, March 30, 2013
LWD Blog Hopping
Thinking Spring... pretty in pink and all that goodness! I am walking in the Aon Breast Cancer walk this June and raising the required $1800... with the help of a lot of great friends and family. I have had items donated for the raffle, cash donations -such generous people. And I am doing my part by adding over 100 items to the raffle prizes (every ticket wins!!)
This was made with a pattern I found on pintrest HERE
Papers are from My Mind's Eye and that super cute bra that I embossed and inked was on the Forever Young cart.
Hope you enjoy your spring time hop around the WWW!
Saturday, March 23, 2013
Lone Wolf Designs - Spring Blog Hop!!
Kris asked if we wanted to hop.... I am in!
As many of you know, I am walking in the Avon Breast Cancer walk this June and working really hard to raise the required $1800 donation. One thing I am doing is co-hosting a spa day and raffle. Every ticket wins ($5 each or 6 for 25 if you are interested)
I thought these little post it not holder/covers would be a cute treat. One is a 2x2 with Stampin Ups owl. I punched a hole in the corner and added a ring. (Thanks pinterest!!)
And then a little one with cupcake postits. Simple cover, zutter binder, some pretty My Mind's Eye cupcake paper layered and the SU cupcake punch.
9 total came together in about 3 hours tonight. Hop along folks, and have fun!!
Labels:
Blog Hop,
crafty khandy,
lone wolf designs,
post it covers
Wednesday, February 6, 2013
Lone Wolf Design Team!!! First Project
Have you found Lone Wolf Designs on Facebook??? No??? Then you are missing out on some deals! Hurry over to check it out
I am on the design team and here is my first project. I picked the Teresa Collins Stationary Noted collection to make a little pocket journal for a friend.
This will be used to keep track of food, mood and other good stuff. This collection with graph paper, notebook style and inspirational quotes was perfect! I used the 6x6 pack, envelope collection. And coordinating brads - they all just match so beautifully.
I have some more details and a mini tutorial on the page construction on a video here
One of the envelopes was perfect as a page all by itself. The recipient can stuff recipes and lists or notes in it for safe keeping.
Here are a few more details shots
Labels:
crafty khandy,
design team,
fitness journal,
lone wolf designs,
pocket journal,
stationary noted,
teresa collins
Subscribe to:
Posts (Atom)